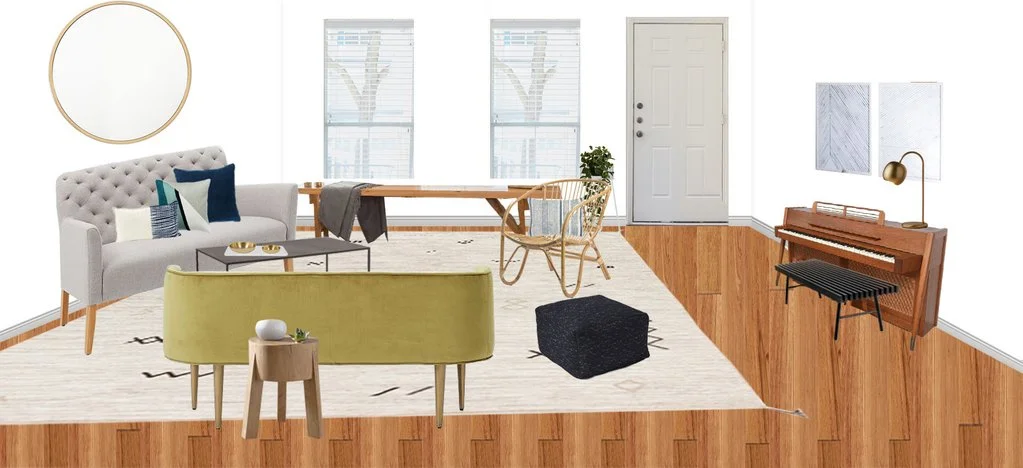
You guys! I just finished a Spruce for a vintage-inspired, multi-use entertainment space, and I couldn’t help but share the preliminary designs!
This particular project was done for a couple of my dear friends, Maggie and Austen. After being in their home for a little over a year, they were still struggling to piece together furniture and decor for their downstairs living room. So, Maggie reached out, asking if I would help guide her on what to buy, and where to put it. Immediately, I knew that the Spruce Kit was the perfect fit for their needs!
Maggie has always had a great eye for quality vintage pieces, and her and her husband, Austen, were long-time customers of the old Love Ding storefront—so, I felt comfortable and confident in the styles they would love. However, it’s always important for me to get a sense of how my clients want their new space to make them FEEL. For the Millers, their vision was a combination of comfortable and social. They truly wanted this to be a multi-use space for either relaxing and playing the piano, or circled around sipping on Negronis with friends.
Austen is quite the bartender too, so it was a priority for me to incorporate his stocked bar seamlessly into my design. The overall goal with this was to keep the space open, so that ideally even at a large gathering, everyone would be able to mill around the room comfortably. And I’m so happy with how the proposed design turned out!
Although the Miller Spruce isn’t 100% complete yet, I couldn’t wait to show y'all a little behind-the-scenes peek into my design concepts for this Spruce, as well as a breakdown of the process from start to finish.
Step 1:
Collaborate
During the first week, all clients receive a packet of starter resources, including a checklist that asks for a list of any existing “must-have” items that must be included in the final design. For Maggie and Austen, this included their grey settee from West Elm, a vintage piano and a set of vintage brass + marble stacking side tables. One of my favorite parts of this step, is collaborating with each client on our secret Pinterest board.
We spend this first week sharing pins and ideas with each other so that I can get a good sense of their design style before going to the drawing board. Are you curious about your design style? Take this 5-minute quiz to reveal yours.
Step 2:
Client Meeting
When I meet the client in person (or over the phone), My goal is to come prepared with a knowledge of all information we gathered up to this point so that I can envision how their space could evolve. My client’s personalities and the special things they have collected over time help me influence my designs, but also equally important is the size of the space. During this step we will take measurements of the space to make sure that any new items fit perfectly.
Step 3:
Concepting
This step is when each client receives a link to a Dropbox folder with their completed design mockup, floor plan and a resource list of items I’ve suggested they purchase for the space. As always, one round of revisions to the design is included in the package. And the true beauty of the Spruce Kit is the flexibility to purchase items and put together your space on your own time!
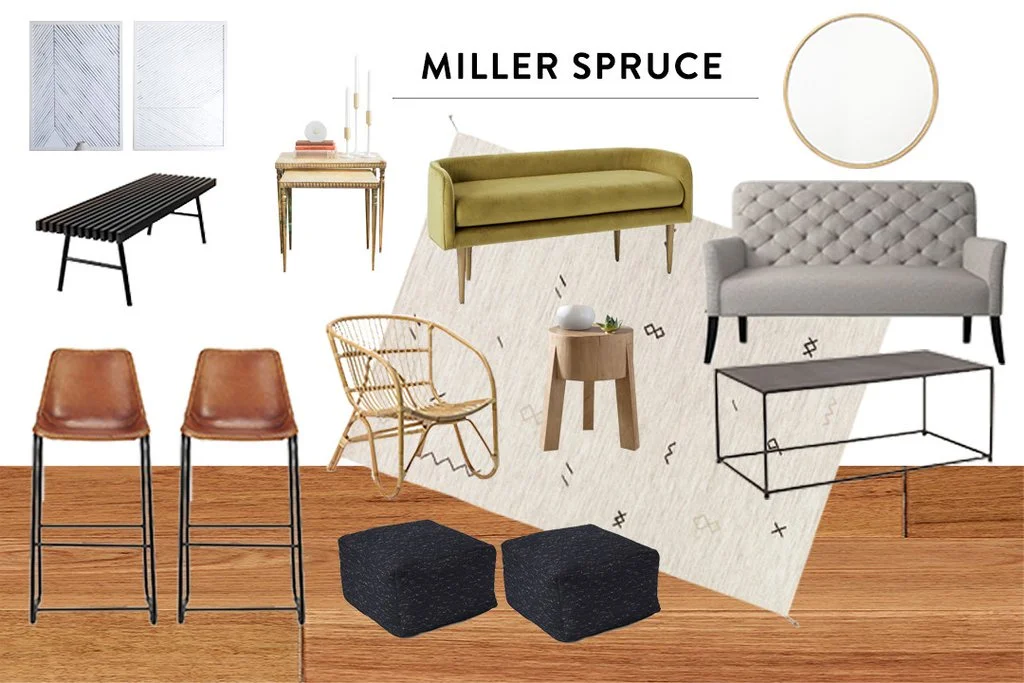
So far, Maggie and Austen have purchased the green West Elm bench, Montezuma rug, and a similar Rattan chair they found at Target. And their living room is looking great so far! It has been so fun to watch them confidently use their Spruce Kit as a guide, as they narrow down their favorites and piece together the space. I can’t wait to share pictures of the final result!

Love, Ding
— RESOURCE LIST —
Celine Bench | Roadhouse Barstool | Originals Roger Stool | Rattan Chair | Special Order Pouf | Uptown Cocktail Table | Iris Planter + Chevron Stand | Metal Framed Oversized Mirror | Crewel Diagonal Color Field Pillow | Leaf Lines Blue Art Print | Cove Art Print | Montezuma Rug | Maze Teal Pillow | Brass Offerings Bowls | Kaleni White Pillow | Transit Bench